
Please be advised that selecting the wrong record type will require you to submit a new application for the correct record type and pay the permit fees again.
You will need to submit a cancellation/refund request for an incorrect record type and may have to wait up to 6 months for a refund.
This could also result in delays in permit issuance and inspections.
To determine the correct record type, visit Do I Need a Permit page.
Certain Non-Residential Permits and Residential Permits, require a pre-application screening to help ensure that the correct permit type is selected. During the process, you will be prompted to answer specific questions based on your selection.
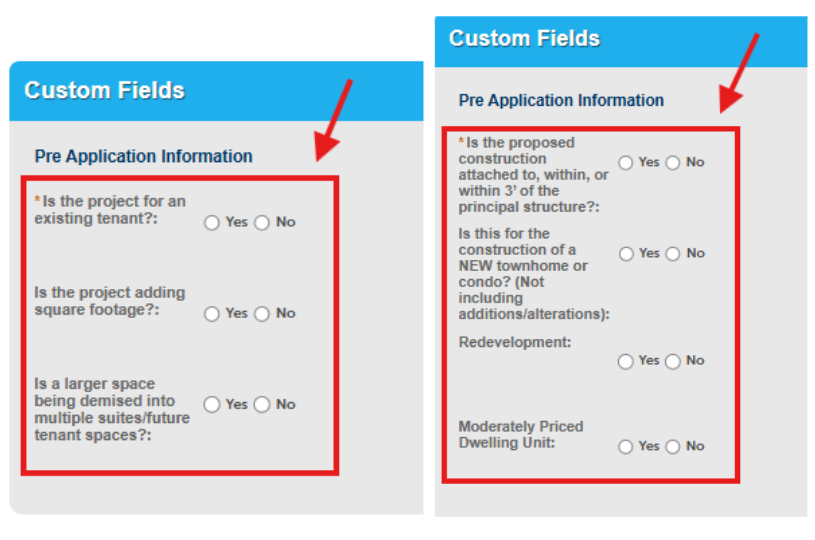
Residential Pre-Application Screening
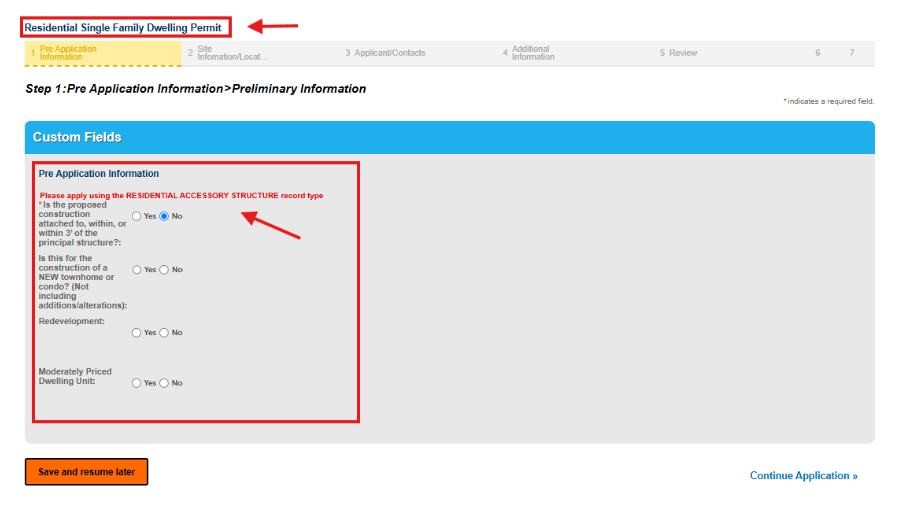
For certain residential permits, a pre-application screening is required to ensure the correct record type is selected. During the process, you will be prompted to answer the following two questions:
- Is the proposed construction attached to, within, or within 3 feet of the principal structure?
- Is this for the construction of a NEW townhome or condo (not including additions/alterations)?
How the Screening Works
- If your responses do not align with the selected record type, a red guidance statement will appear above the question, indicating the appropriate record type to select.
- If your responses align with the selected record type, you will proceed with the application process.
Non-Residential Pre-Application Screening
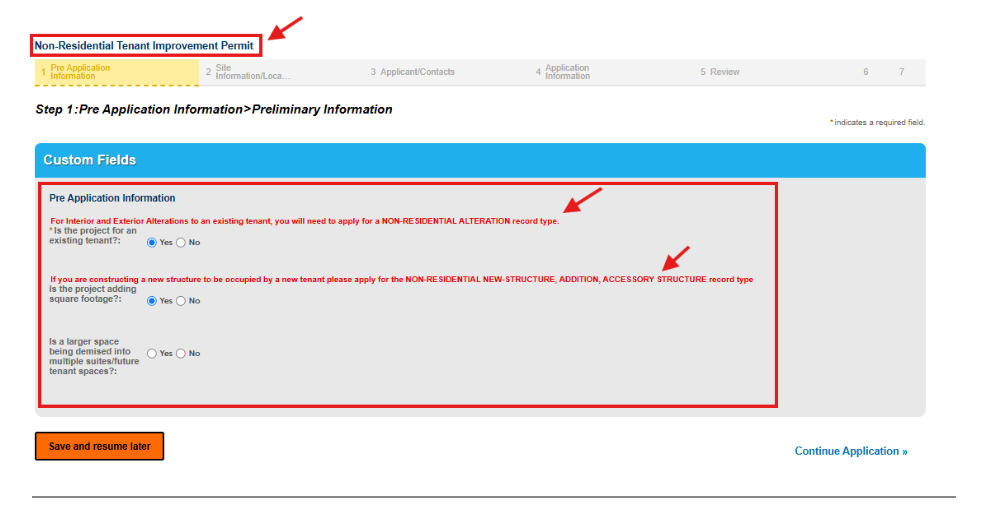
For certain non-residential permits, a pre-application screening is required to ensure the correct record type is selected. During the process, you will be prompted to answer the following three questions:
- Is the project for an existing tenant?
- Is the project adding square footage?
- Is a larger space being divided into multiple suites or future tenant spaces?
How the Screening Works
- If your responses do not align with the selected record type, a red guidance statement will appear above the question, indicating the appropriate record type to select.
- If your responses align with the selected record type, you will proceed with the application process.
Important Notes
- Questions marked with a red asterisk (*) are required to continue.
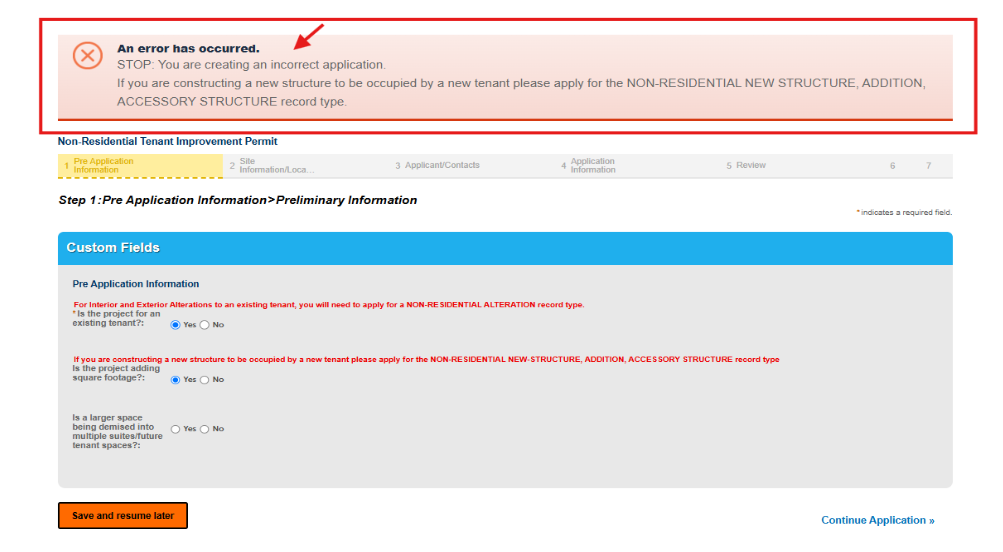
- If the responses provided are incompatible with the selected record type, a red error message banner will display at the top of the page, advising you to stop and restart your application using the correct record type
Please be advised that selecting the wrong record type will require you to submit a new application for the correct record type and pay the permit fees again.
You will need to submit a cancellation/refund request for an incorrect record type and may have to wait up to 6 months for a refund.
This could also result in delays in permit issuance and inspections.
*If you do not have an existing LUN account please refer to the General Access section for instructions to create an account*
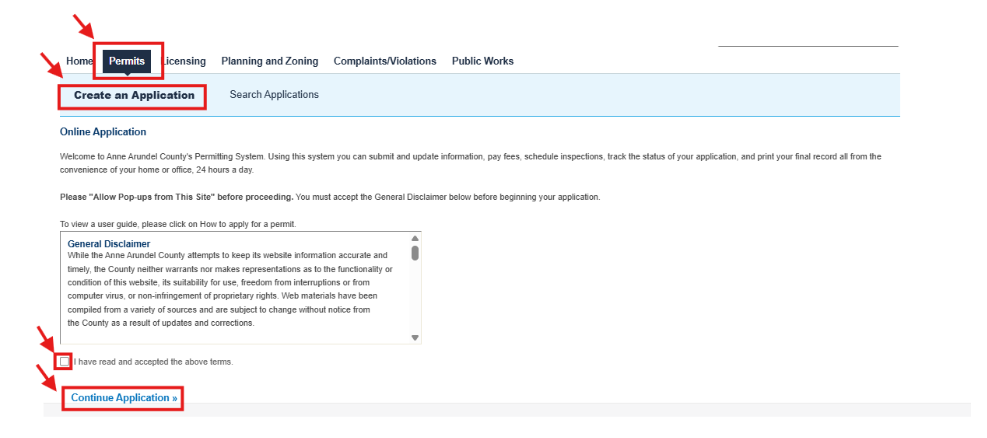
- Log in to the Land Use Navigator and from your home page
- After logging in, click the Permits button and select Create an Application.
- Read the directions, including allowing pop-ups.
- Review and Accept the disclaimer before proceeding.
- Select Continue Application
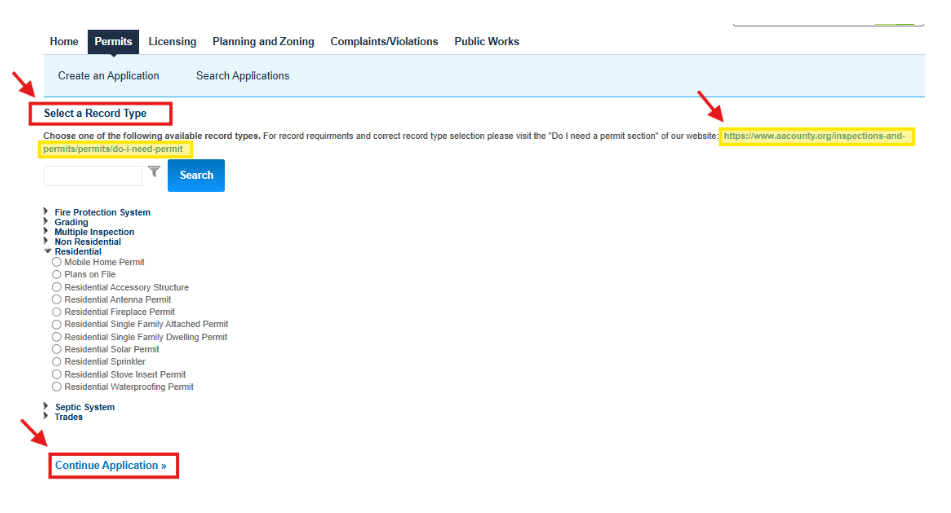
- Select a Record Type for New Application
- There are subgroups within each of the choices. If you do not see the proposed record type, make sure the required license is attached to the account.
- DO NOT PROCEED If you are unsure what record type to choose. Please visit Do I Need A Permit to determine the correct record type.
Please be advised that selecting the wrong record type will require you to submit a new application for the correct record type and pay the permit fees again.
You will need to submit a cancellation/refund request for an incorrect record type and may have to wait up to 6 months for a refund.
This could also result in delays in permit issuance and inspections.
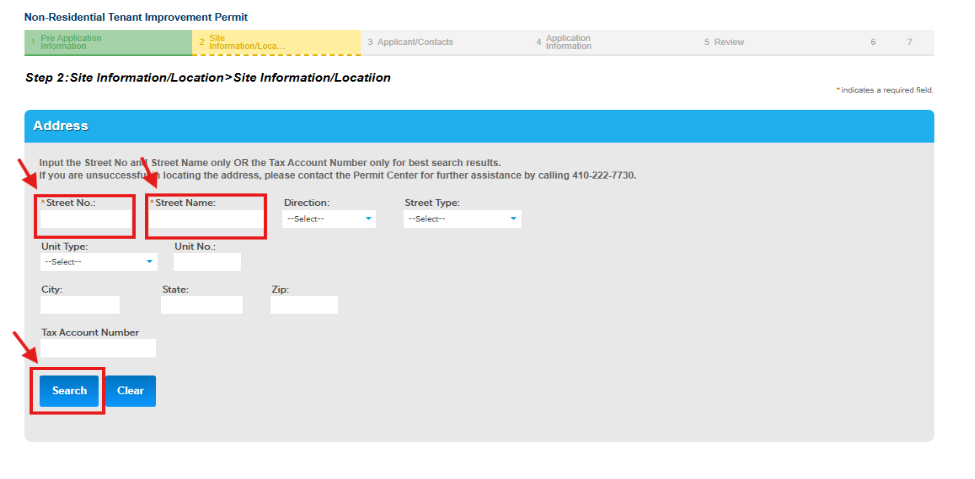
Select Address, Parcel, Owner
- Step 1 of the Land Use Navigator intake is to identify the permit location. The address, parcel, and owner (APO) reference data is loaded from the Maryland State Tax Data (SDAT) and the County’s GIS parcel/address data periodically. This reference data is used to select the correct information for each permit.
- One parcel may have multiple addresses and may also have multiple owners associated. Since many owners own multiple parcels as well, the best way to search is to start with an address or a Tax Account ID. Both of which may be searched in the Address screen below.
- If you are searching by address, enter only the street number and street name (not street type). You also have the option to search by Street Name only to see all of the addresses on the street.
- If you have the Tax Account ID, you may use it to search for the correct address.
Multiple Addresses
There may be multiple addresses displayed based on the search as shown below. This may occur because there are multiple addresses on a property. Select the address that matches the application.
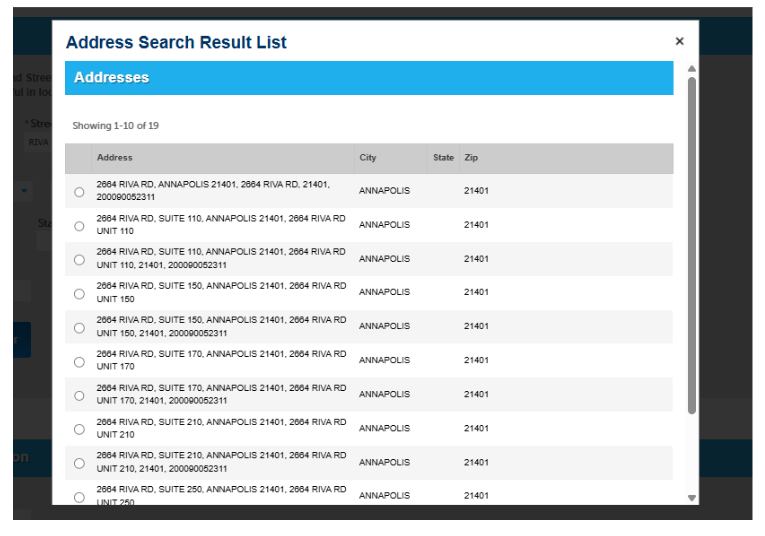
- There is a parcel and one or more owners associated with each address. Compare the associated parcel and the owners to the application. If there are multiple parcels or owners, select the correct one and then select the Select button.
- The parcel and owner depicted below are associated with the previous example where there is only one owner related to the parcel.
- After selecting the APO data, the application will show the related data. The Parcel and Owner data is not editable. This is because it is coming from the reference APO data (SDAT) and should not be edited.
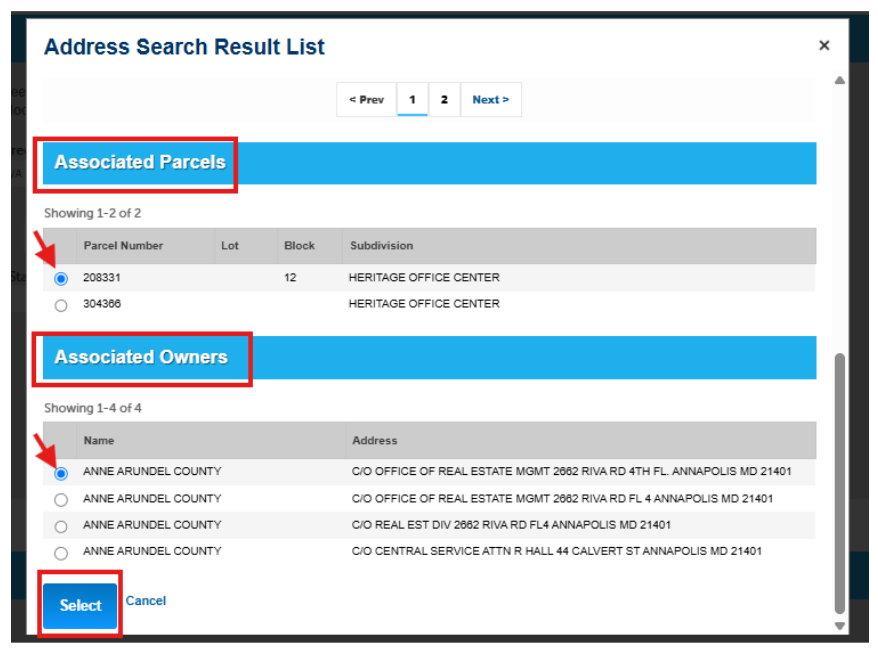
Parcel Data
- The Parcel Data should show the parcel characteristics for the selected property.
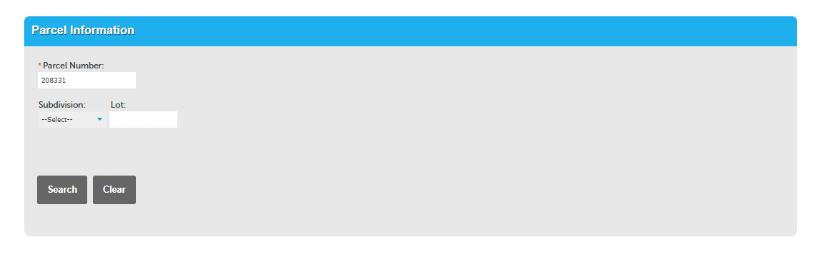
Owner Data
- The Tax Account ID for the owner should match the Tax Account ID for the address. The owner data is coming from the State Tax Data (SDAT). The Owner Name is in one field. The Company name may be in address Line 1, and the address in Line 1 or 2. The city, state, and zip code is in Address Line 3 which is labeled as “City, State, Zip”. If the property has a new owner that is not displayed here, create a new contact for the permit with "owner" selected as the contact type and add the ownership documents at the time of document upload.
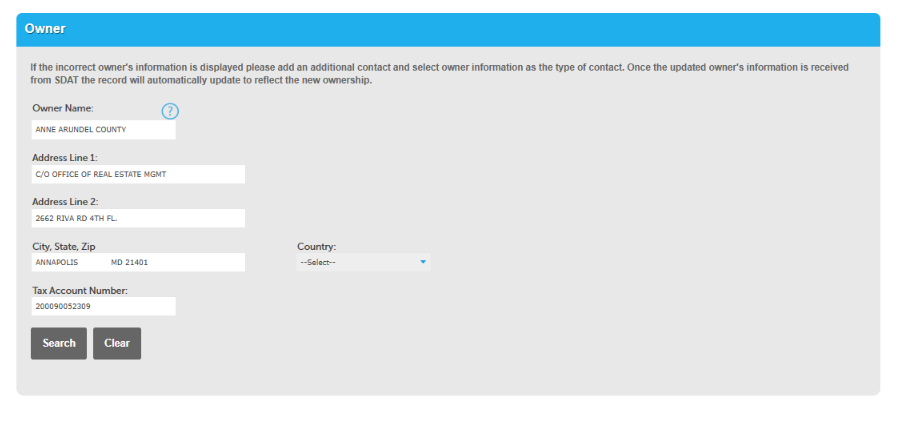
Save and Resume Later
- After completing the Step 1 location information you may Save and Resume Later or Continue the application. If you click your browser back button before saving, you will lose the information entered so be sure to Save and Resume Later if for any reason you are leaving this page. For safety, you may wish to Save and Resume Later. Then you are given the option of continuing or reviewing the previous step data.
- The record number at this point is a temporary number. The final permit number won’t be displayed until the application is submitted.
- Temporary numbers will automatically be deleted from your account 30 days after they are created and can not be recovered.
Step 2: Applicant/Contacts
- The next step is to enter a Licensed Professional and other contacts.
Licensed Professional
- Some permits, such as trades, must be applied for by a licensed professional. This section allows you to select a license that is attached to your account or “Look Up” a license that has been verified and added to our Licensed Professionals Table.
- State issued licenses such as HBR (Home Builder Registration #), HIC (Home Improvement Contractors), MSC (Maryland Sprinkler Contractors), and other general contractors who are not in our Licensed Professionals Table will need to be verified and entered by the Permit Center intake staff. To have your state license added please send a request to permitcenterhelp@aacounty.org
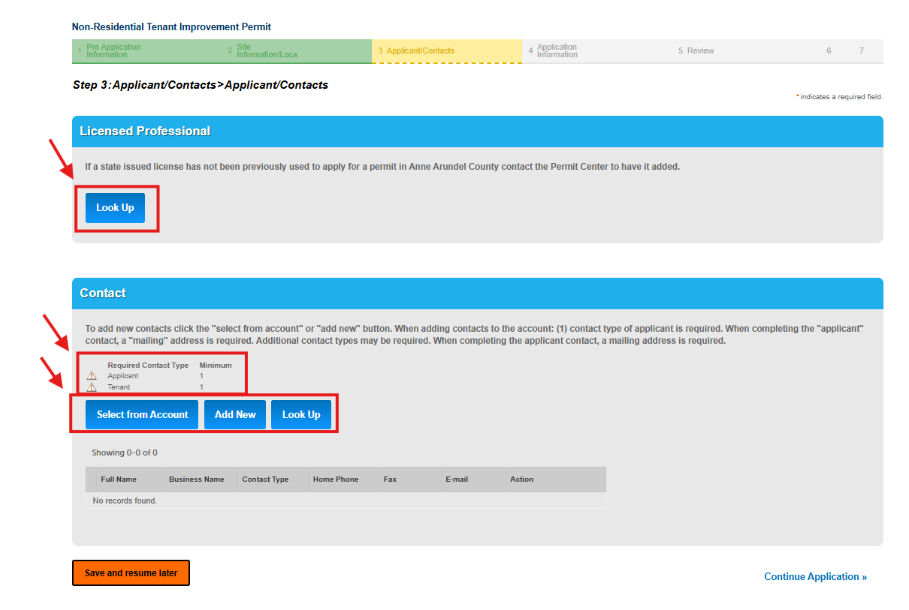
Contacts
You may add Contacts from the Public User Account, This especially makes sense if the account belongs to the owner or applicant. Or you may select Add New.
- Select a type of contact for each contact added.
- All permits must have 'Applicant' as the Contact Type for at least one of the contacts. (i.e. the homeowner can enter themselves twice, once as 'Applicant' and once as 'Owner Information')
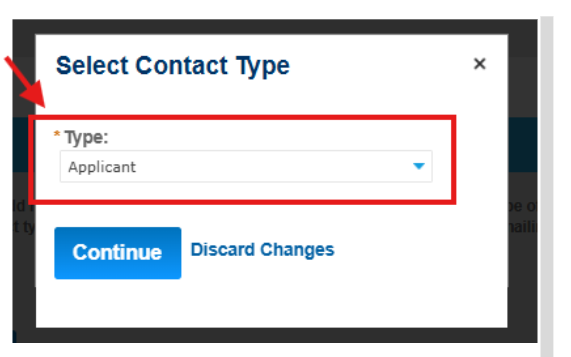
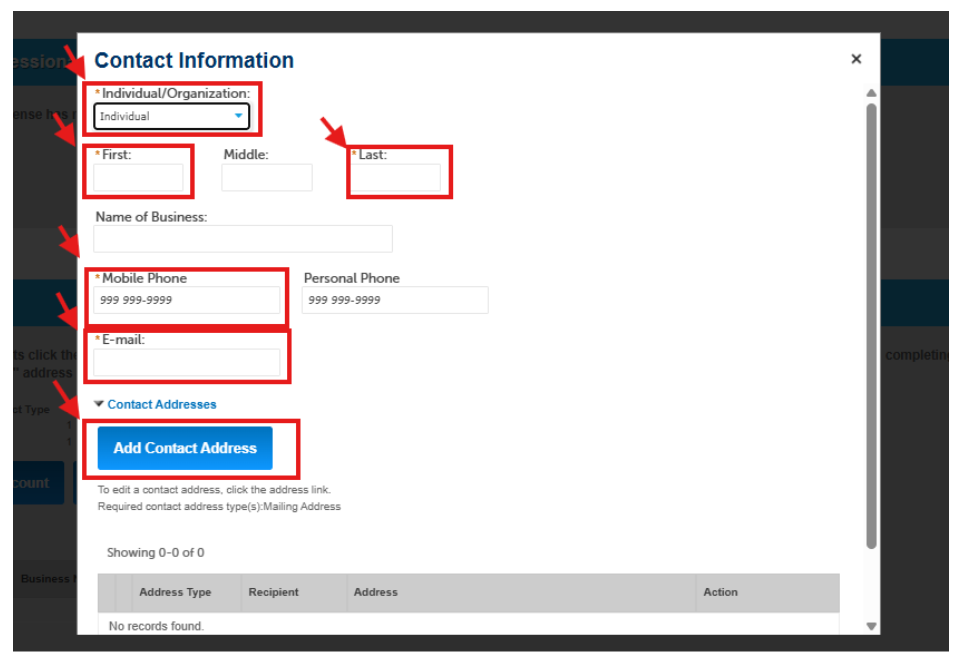
- When selecting the “address type” please choose “Mailing Address” address for the contact address. You can add additional address types but it will not allow you to move forward without a “Mailing Address” type.
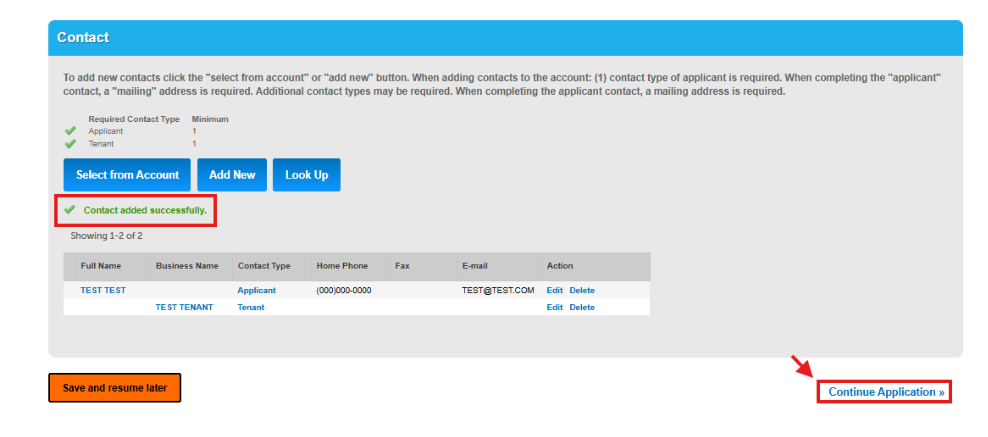
Step 3: Application Information
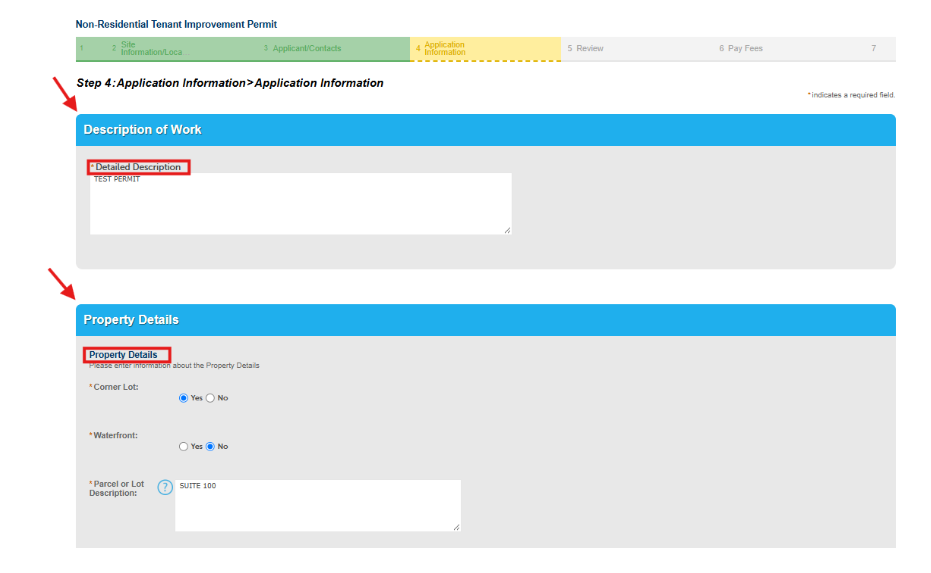
- This section contains details about the property and the proposed work for this Record Type such as description of work, property details, utility details, general details, building characteristics, construction details, & custom lists (for proposed work only), etc.
- Complete all fields to prevent any delays in processing
Attaching Documents
- Attach all documents that are required for this Record Type.
- Click Add to browse to your first document in File Explorer.
- All files must be uploaded in PDF form. *Failure to do so will result in delayed processing.
- If a required document does not pertain to your specific record, upload a blank document to continue.
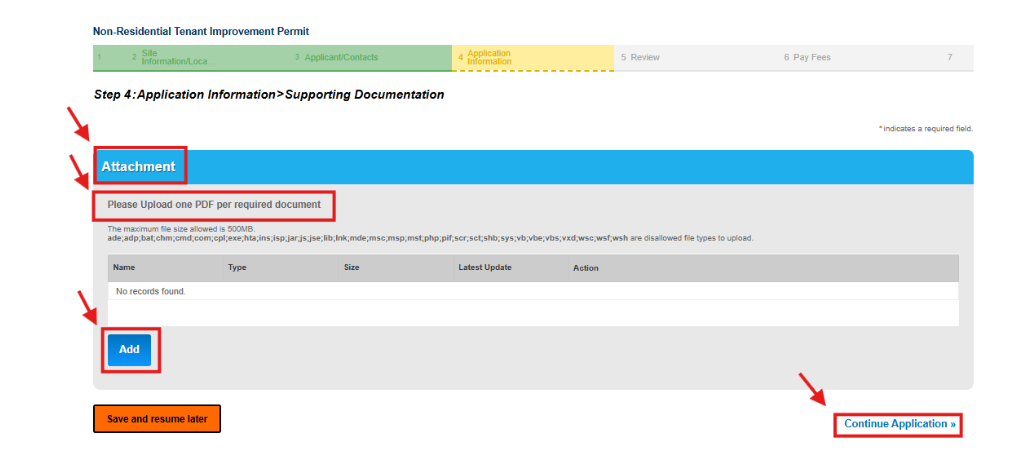
- Select “Add” to attach the required documents
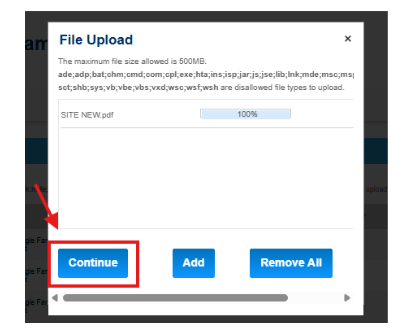
- After all required documents are added, select “Continue"
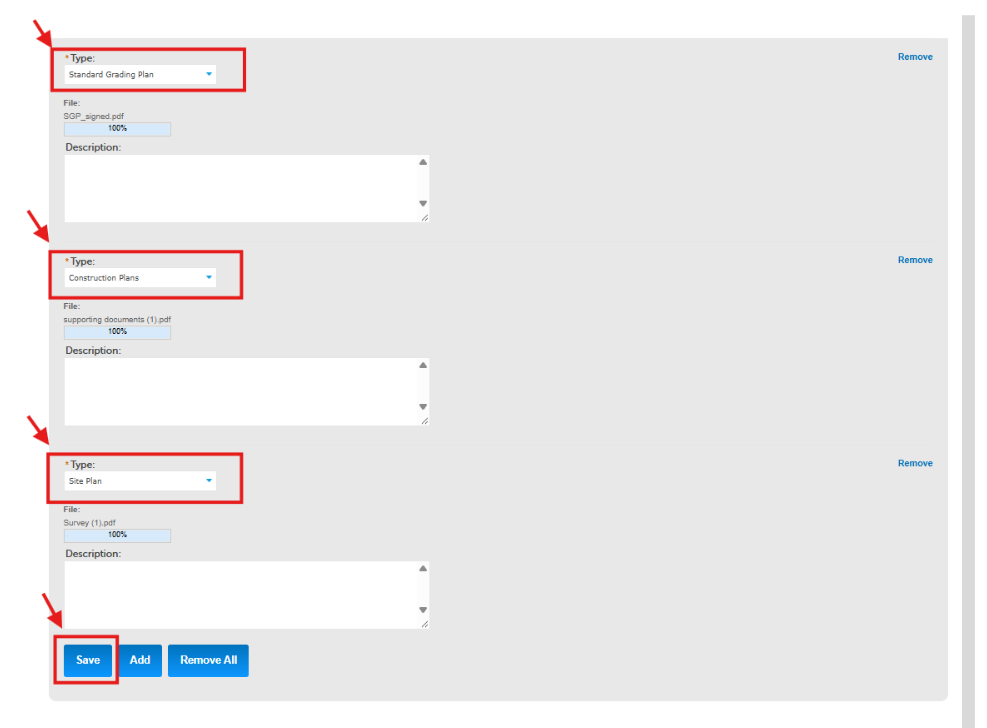
- Select the “Document Type” for each and enter a description
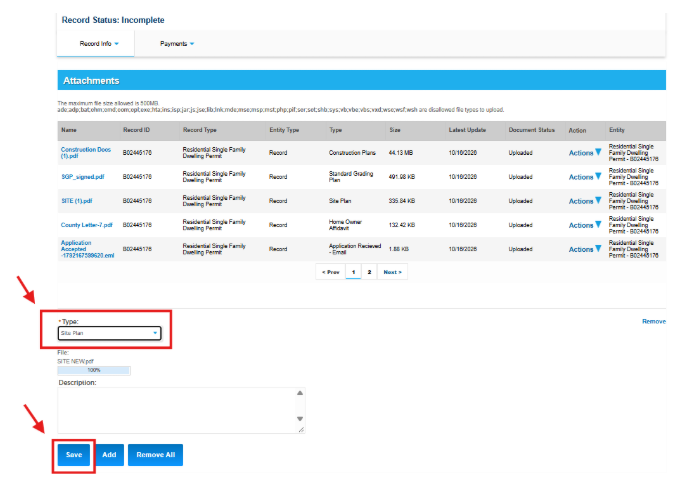
- After selecting a Type and entering a description for each document, select “SAVE"
- You will not be able to remove documents once they are saved
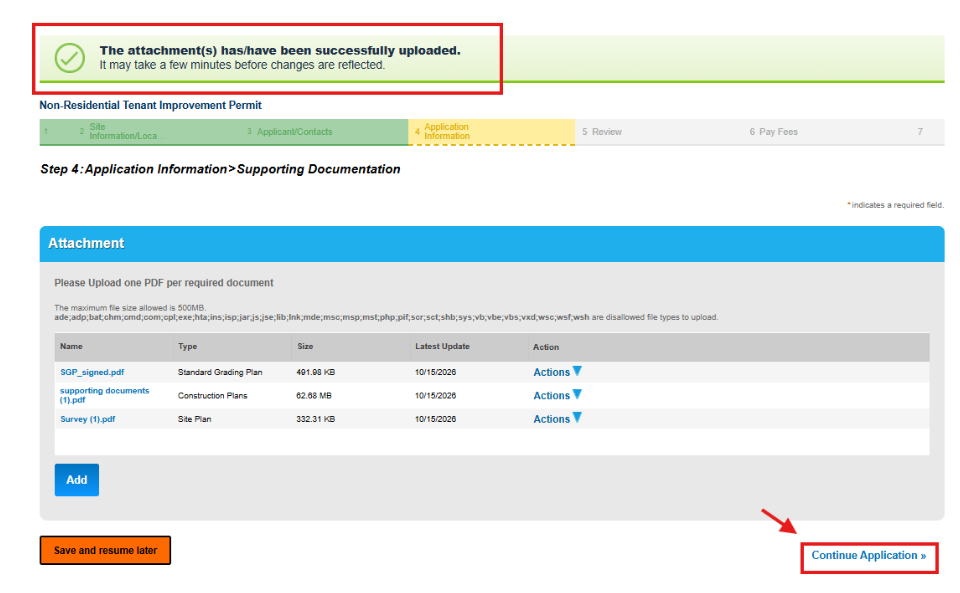
- Additional documents may be added with the Add button.
Step 4: Review Application
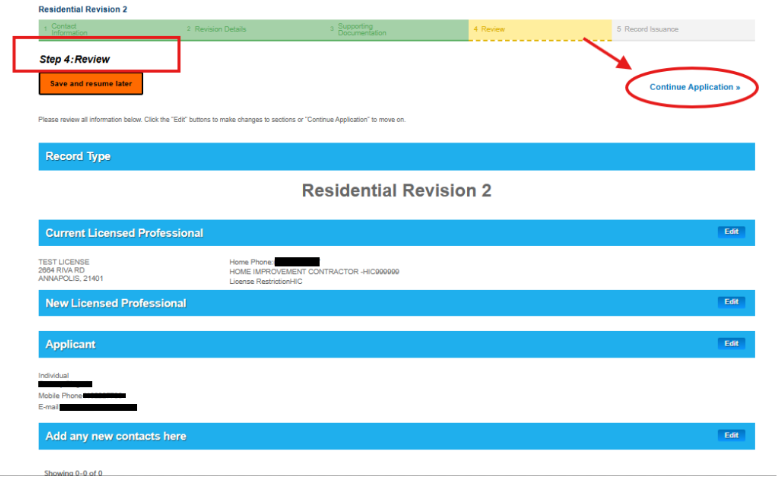
- Verify all submitted information is accurate, check the certification box, and click “continue application”
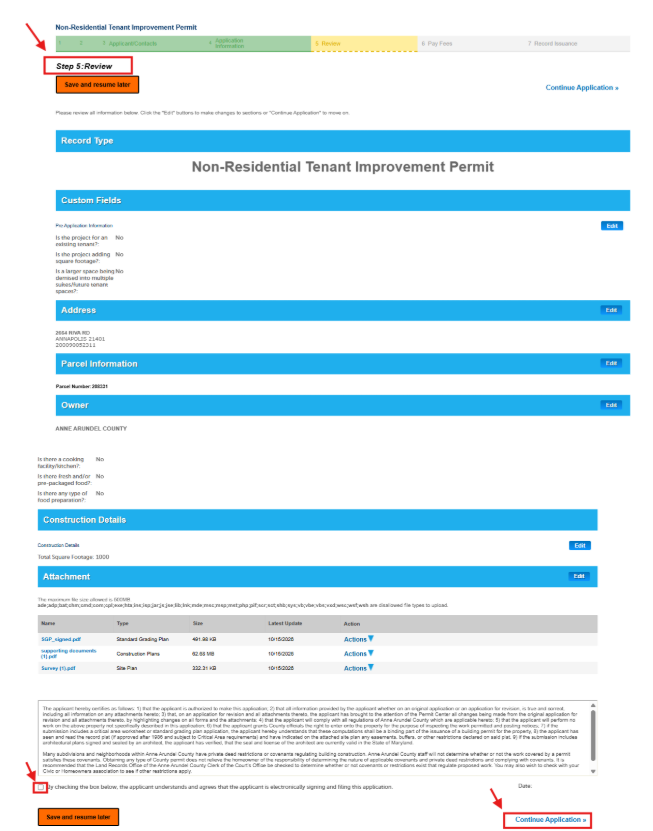
Step 5: Submit Application
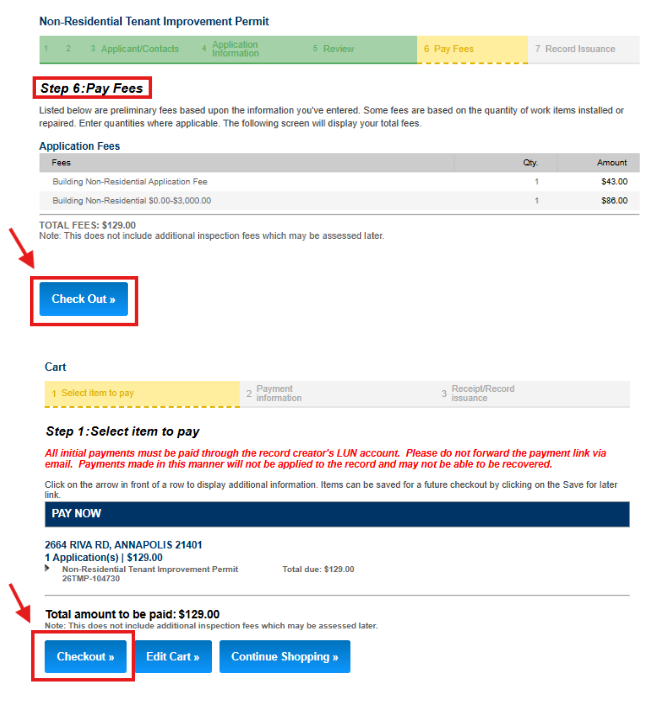
- After selecting Continue Application you will be taken to your fee screen. Once you select Checkout you will be taken to your cart. You can either checkout, edit your cart, or continue shopping to apply for additional permits.
- Once payment is complete you will be assigned a record number. Occasionally it will assign a temporary number (22TMP-000691).
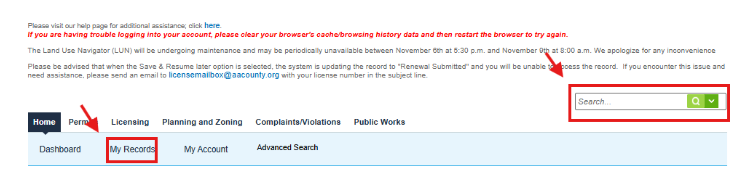
- If this happens, wait a few moments and click on My Records to refresh and assign a permit number.
*If you do not have an existing LUN account please refer to the General Access section for instructions to create an account*
Log in to the Land Use Navigator and from your home page, select My Records OR search for the permit
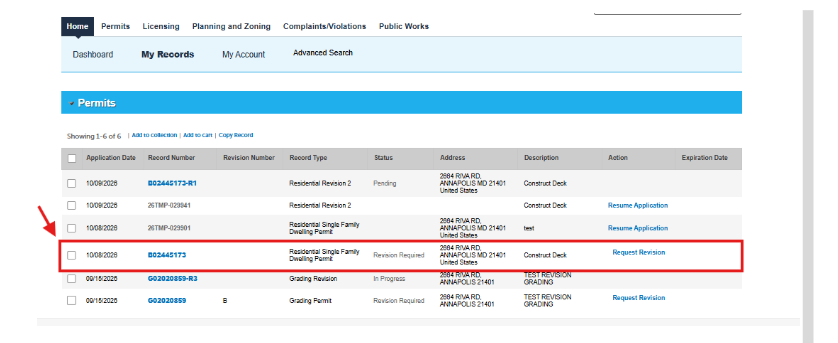
- Click on the record number you would like to access.
- Click on the Record Info drop-down menu then select Processing Status
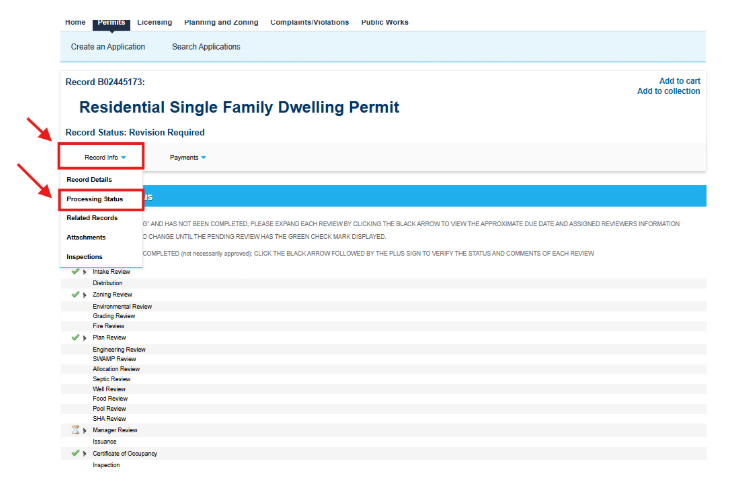
Reviewing Processing Status
- From the processing status option click the arrows to expand and view detailed information including the approximate due date, the date the review was completed and by whom. A green check mark means the review has been completed (not necessarily approved). An hourglass means the review is in process
- Click the + sign to access reviewers comments
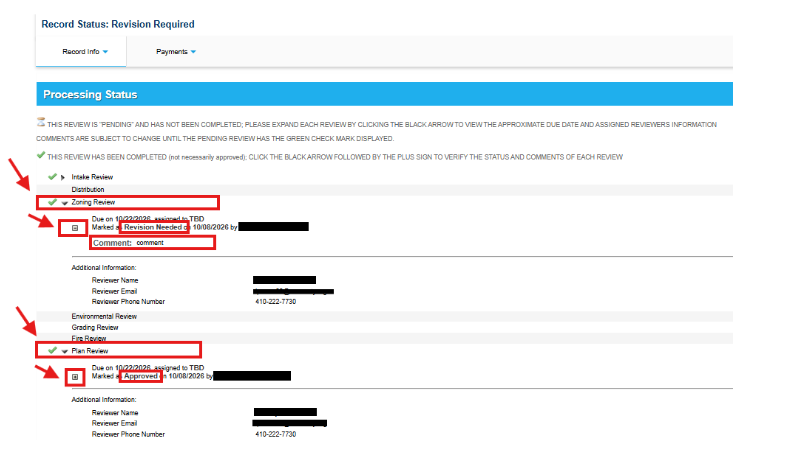
- The manager review is the final task and will be completed by administrative staff. A revision cannot be submitted until the manager review is completed and the "Request Revision" link becomes active. If all reviews have been completed except for the manager review for more than five business days please contact the Permit Center at permitcenterhelp@aacounty.org
*If you do not have an existing LUN account please refer to the General Access section for instructions to create an account*
- Log in to the Land Use Navigator Portal https://www.aacounty.org/lun
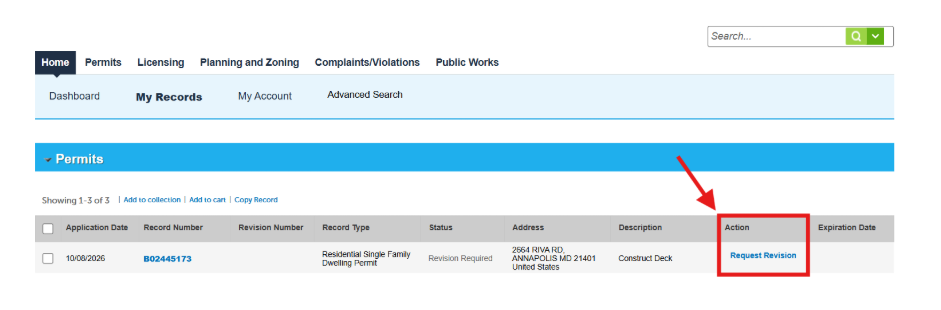
- Select “My Records”
- Select the blue “Request Revision” button located to the right of the permit number in the Action Column
Step 1: Contacts
Licensed Professional Section
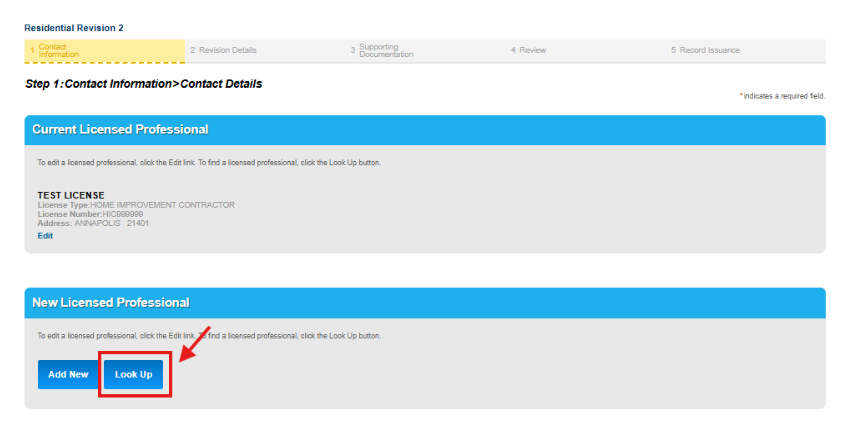
- If the permit already has a licensed professional, you will see this information reflected in the “Current Licensed Professional” section. If this information remains correct, you may move forward.
If the permit does not have a licensed professional OR if you need to update the current licensed professional related to this permit you can do so under “New Licensed Professional”. Select “Look Up” to search for the new licensed professional.
Note: If you need to remove the current licensed professional from the permit and do not want to replace them with a new licensed professional at this time, be sure to include that request in your detailed description box. Intake staff will remove the licensed professional upon revision request review.
Please be advised that the only contact associated with a Trade permit can be the Licensed Professional. The Licensed Professional cannot be changed on a Trade permit.
If the Licensed Professional needs to be updated, a cancellation form must be submitted for the existing permit and a NEW permit must be applied for by the new Licensed Professional.
To request a cancellation, download the cancellation form from the “Forms and Publications” page on the Inspections and Permits website, and email the form to permitcenterhelp@aacounty.org.
Adding/updating contacts
The applicant box reflects the current applicant listed on the permit. This box can not be edited.
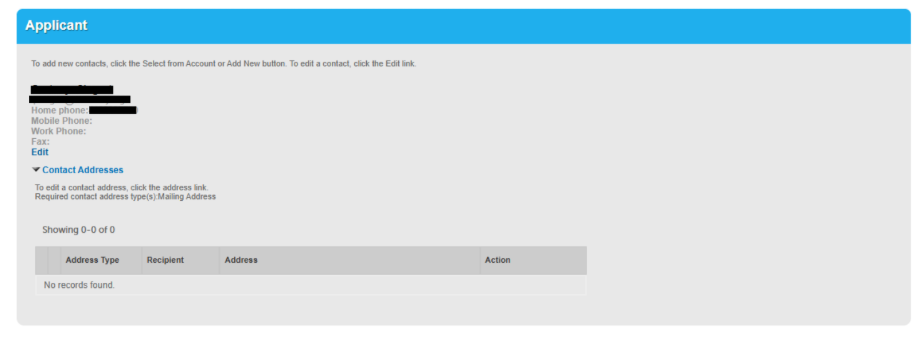
Important Notice: The current applicant listed will be the ONLY individual to receive not at all communications regarding this revision request. If someone in addition to the applicant listed would like to receive communications be sure to ADD THEM to this section.
- Permissible Contact Types:
- You may only select from the following designated contact types: Applicant, Architect, Attorney, Authorized Agent, Contractor, Developer, Engineer/Surveyor, Owner Information, Payor, and Tenant.
Contact Selection and Replacement:
- One Contact Per Type: Each contact type can be used only ONCE.
- Replacing Existing Contacts: Adding a NEW contact with the SAME contact type as a person currently listed on the permit will automatically REPLACE the existing contact. Example: If a add a new “applicant” contact type and you insert a new “appplicant” in this section, the newly added applicant will REPLACE the previous one.
Instructions to Add a Contact:
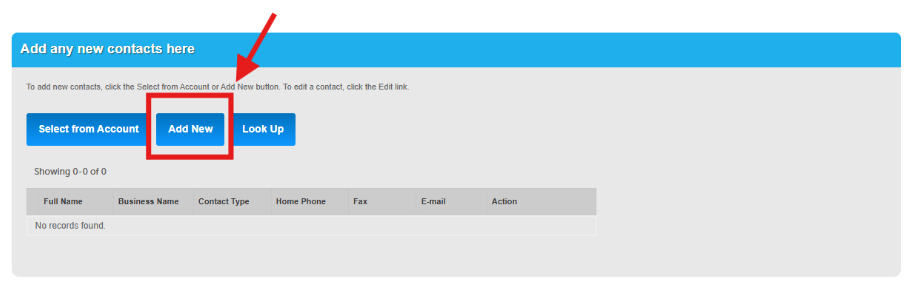
Click the “Add New” button, then choose one of the approved contact types from the drop-down menu to complete the details.
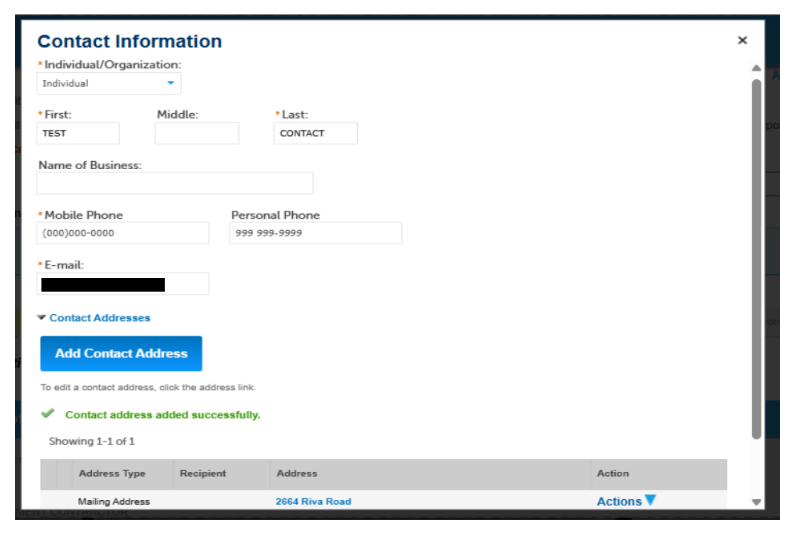
- Enter contact details. When adding an address be sure to choose address type "mailing address". Select Continue.
Step 2: Revision Details
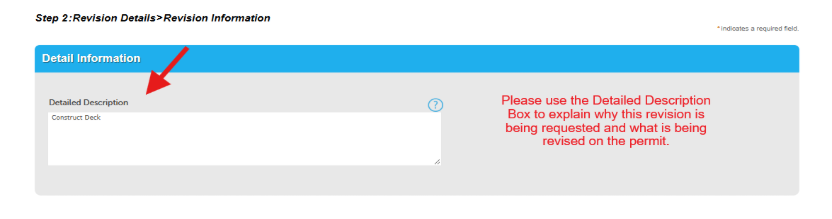
- Use the Detailed Description Box to explain why this revision is being requested and what is being revised on the permit.
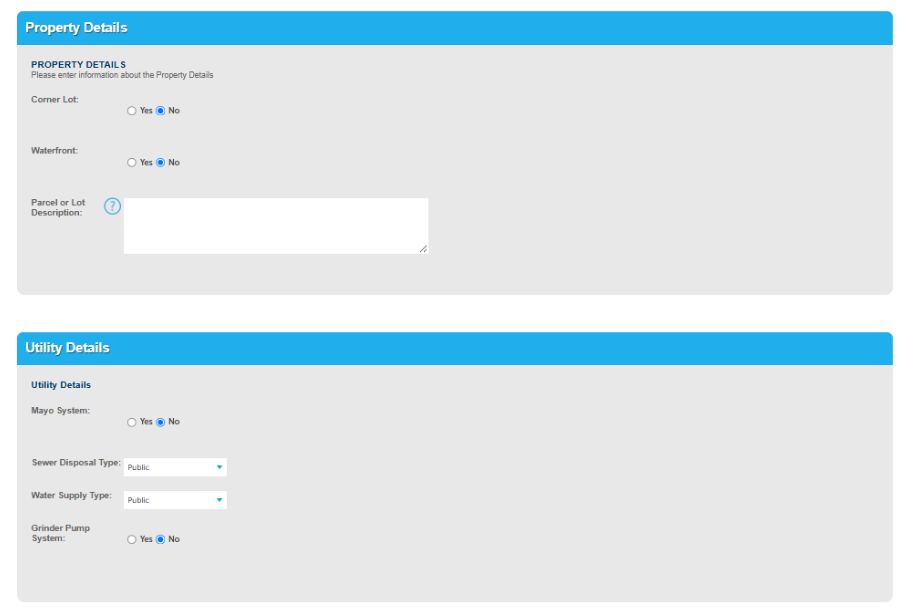
- Review the existing Property and Utility Details and update accordingly.
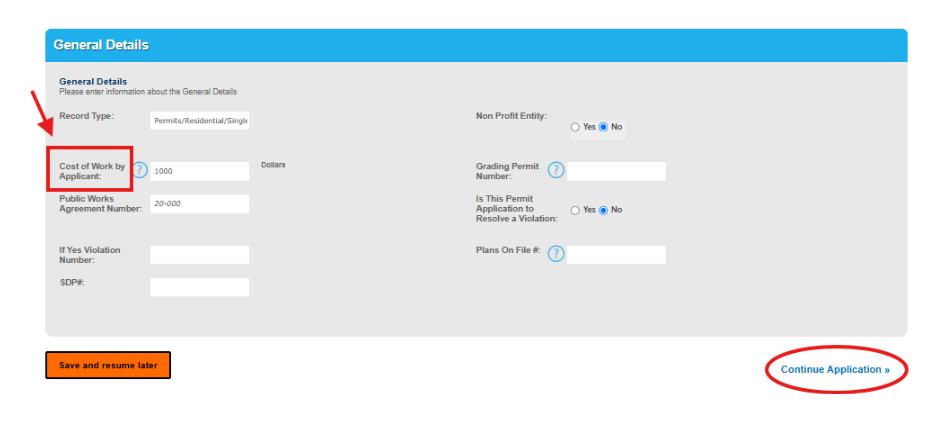
- Review the editable General Details and update accordingly.
- Note: The “Cost of Work by Applicant” Box should be updated to reflect the new TOTAL cost for construction. Select continue to move forward.
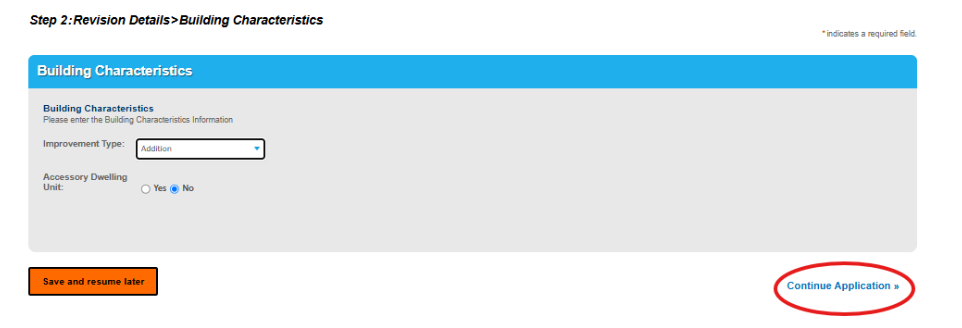
- Review the editable Building Characteristics entered on the permit and update accordingly. Select Continue.
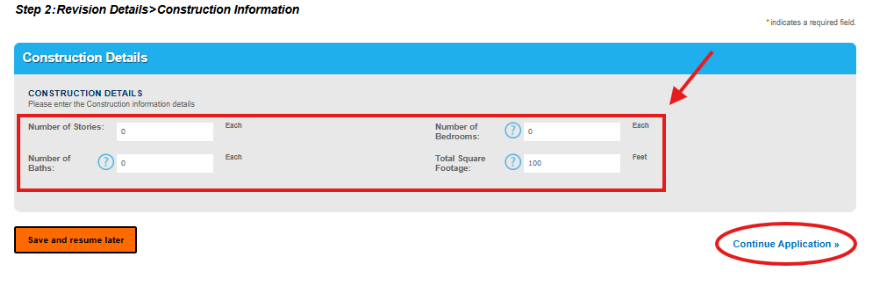
- Review the existing Construction Details and update accordingly.
- Note: These fields should be updated to reflect the new TOTAL. Select Continue.
- Review the existing Construction Dimensions and update accordingly.
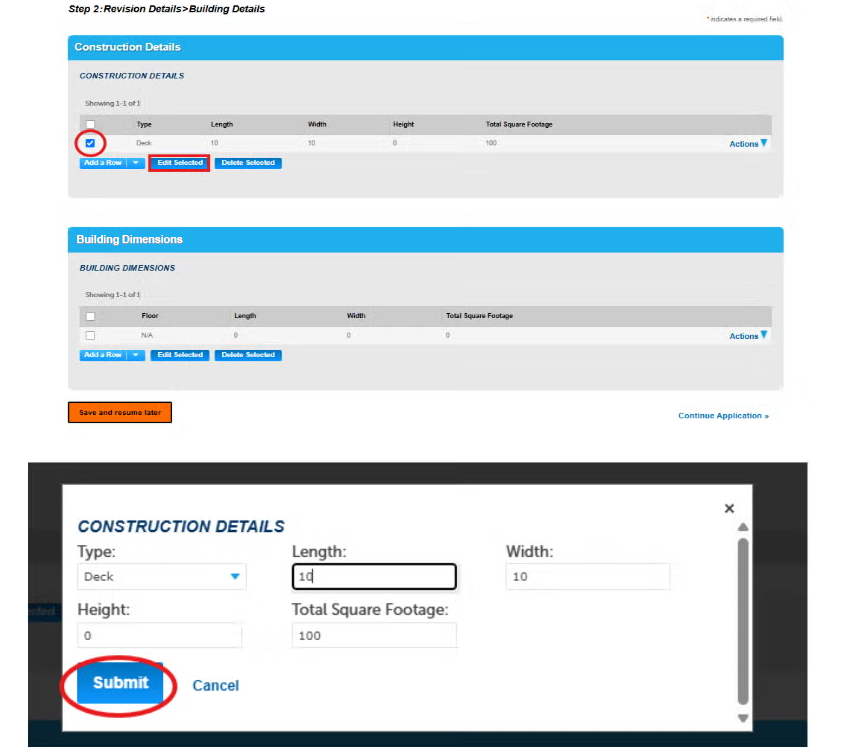
To Revise: Select the box to the left of the dimension set you would like to change. Then select “Edit Selected”. You can then change the “type” and "dimensions". Select Submit to save.
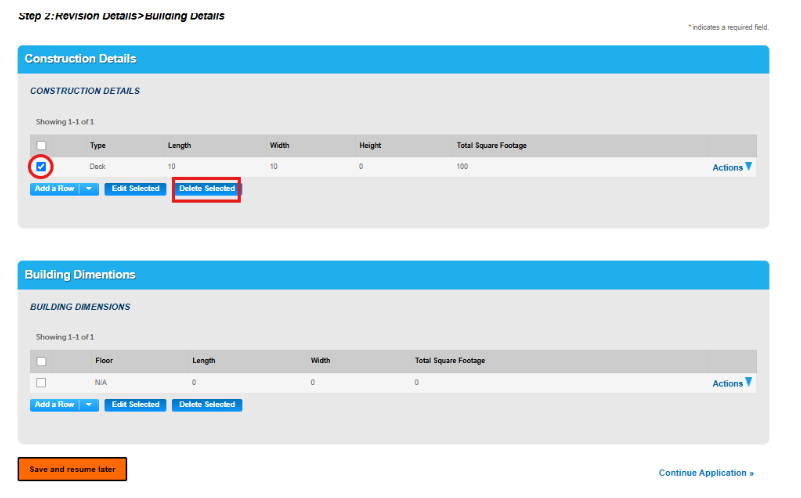
To Delete: Select the box to the left of the dimension set you would like to delete. Then select “Delete Selected”.
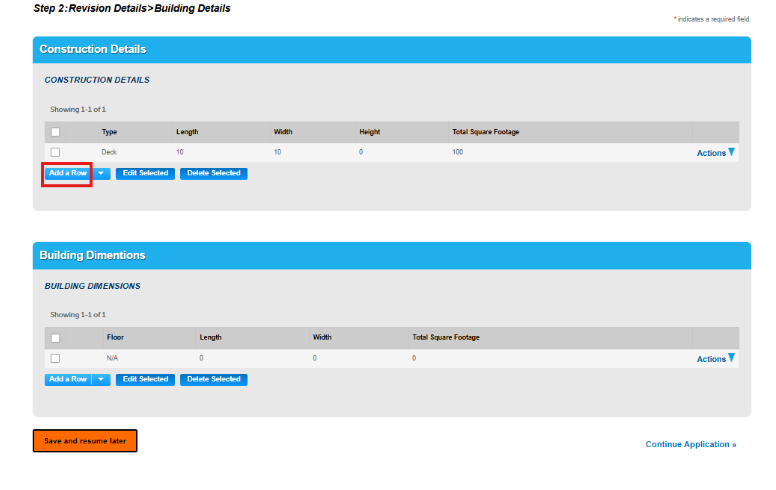
To Add: Select “Add a Row”, choose the “type” in the drop down menu and enter the dimensions. Select Submit
- Once all displayed dimensions reflect the total the proposed construction, select continue.
Step 3: Attachments
- Upload all supporting documents for this revision request in .pdf format. Note: Not ALL documents require a formal revision.
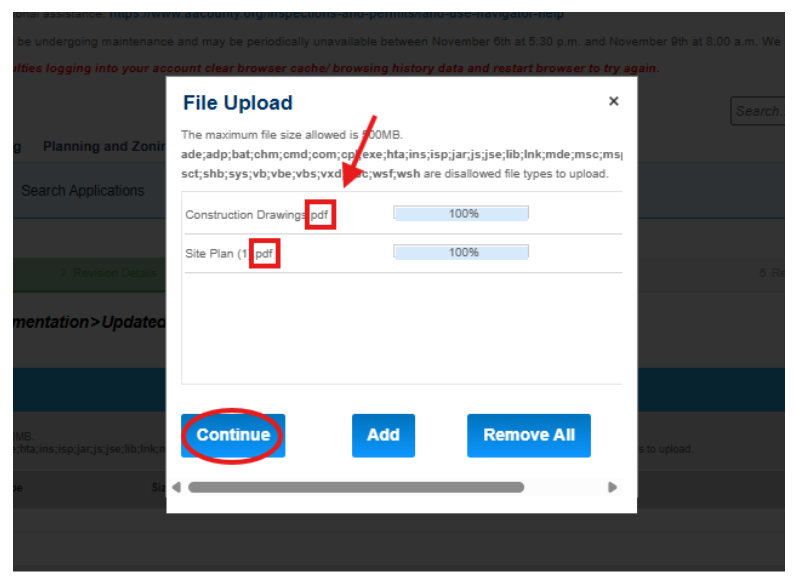
- To Upload attachments: Select “Add”. Another box will appear, select “Add” again and select the files you want to upload. Once uploaded, confirm all files are uploaded in .pdf format. If you need to remove the attachments select “Remove All”. Select Continue.
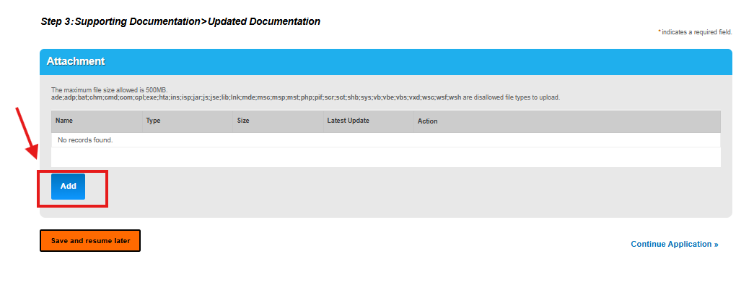
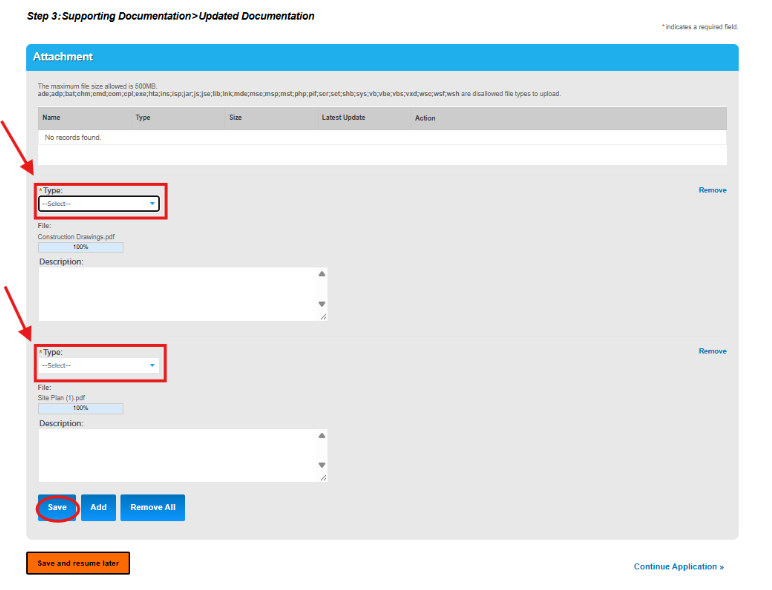
- Select the “Type” for each of the uploaded attachments. You can also add additional attachments or remove the uploaded attachments on this screen. A description of the attachment is not a requirement. Once you continue on this screen you will NOT have the option to delete the uploaded attachments. Select Save
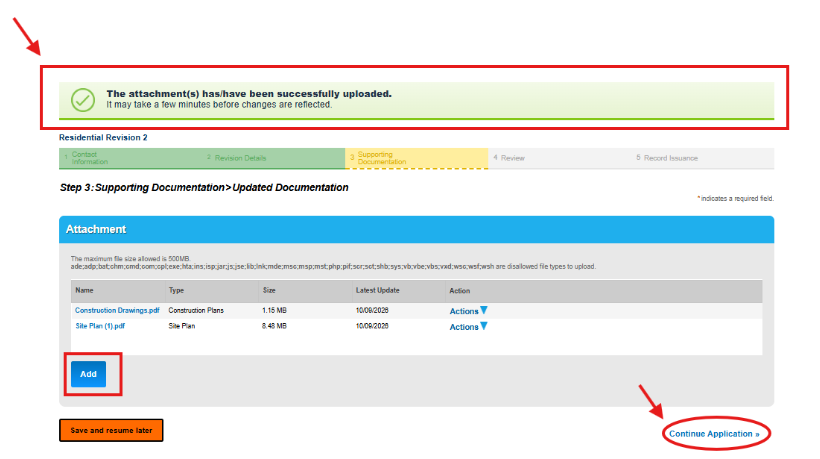
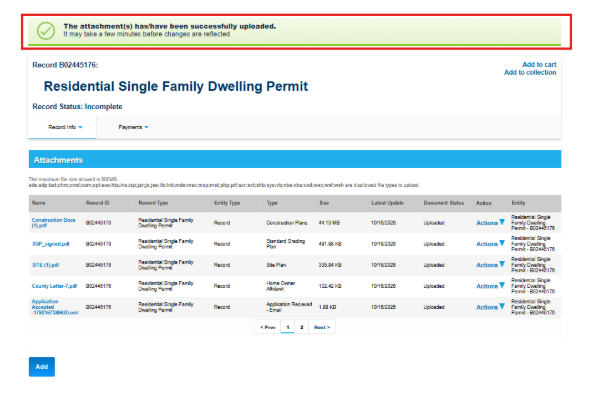
- A green "successfully uploaded” banner will appear. If you need to add additional attachments you may do so by clicking “Add”. You will not have the option to delete attachments at this point. Once all attachments are uploaded, select Continue.
Step 4: Review Revision Request
- Review the revision request for accuracy. If you need to edit a section select “Save and resume later”. This will save the revision request as a temporary record number under “records” on the permits screen. To edit information within the revision request select “Resume Application” and “Start from beginning”.
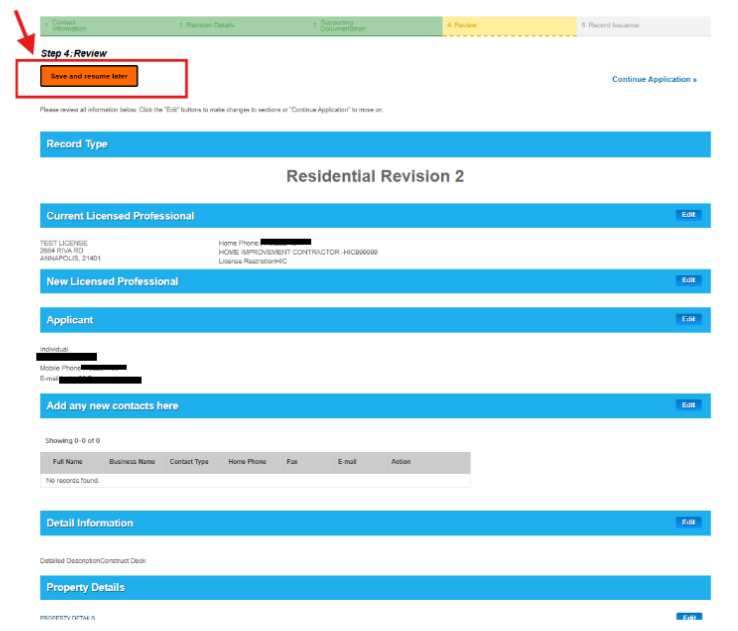
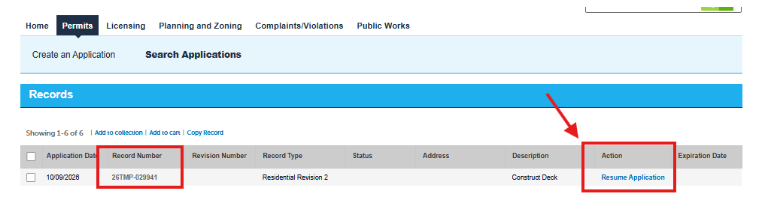
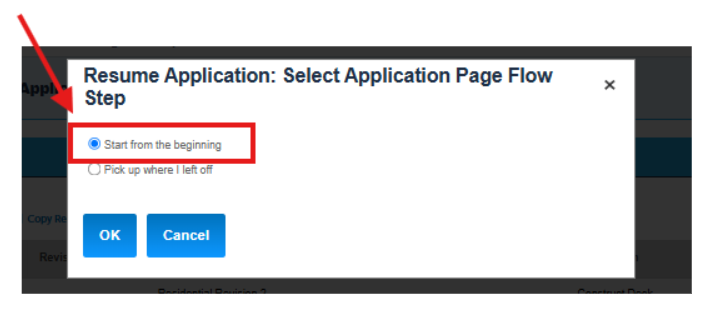
- Click through the revision request until you find the section you would like to edit. Edit as needed. Once you reach Step 4 and confirm all information is correct. Select Continue.
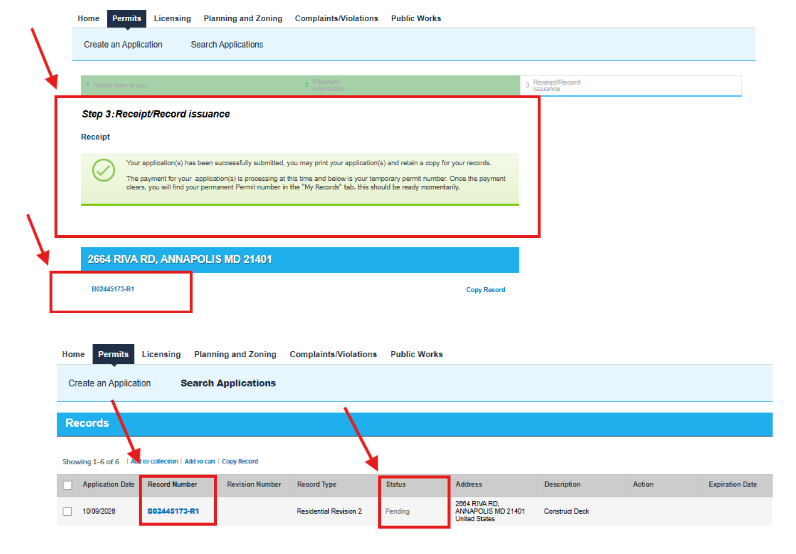
- A green "successfully submitted” banner will appear at the top of the screen. The permit number along with the corresponding revision request number will appear at the bottom of the screen. At this point the revision has been submitted and is in the queue to be reviewed. This number will be listed in the “records” tab with a status of “pending” until it is reviewed.
- You will not have the ability to edit this revision or submit a new revision until this request has been reviewed
*All initial payments must be paid through the record creator's LUN account. Please do not forward the payment link via email. Payments made in this manner will not be applied to the record and may not be able to be recovered.
To make payments to an existing record. Log in to the Land Use Navigator and from your home page, select My Records.
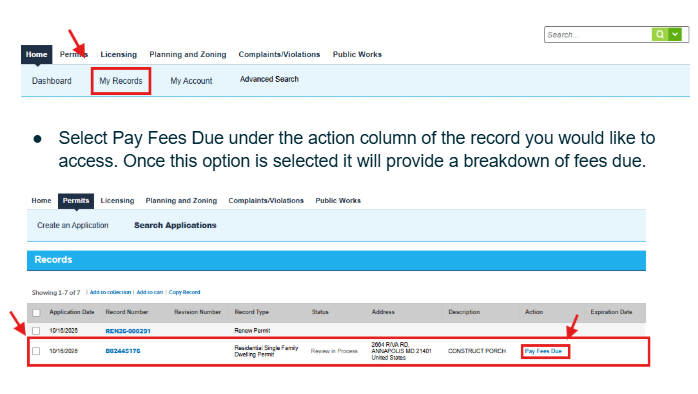
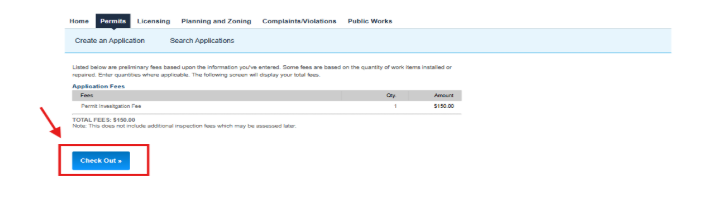
- Select Check Out and the fees will be added to your cart. You can choose to Continue Shopping or select Check out and be redirected to the third party payment screen
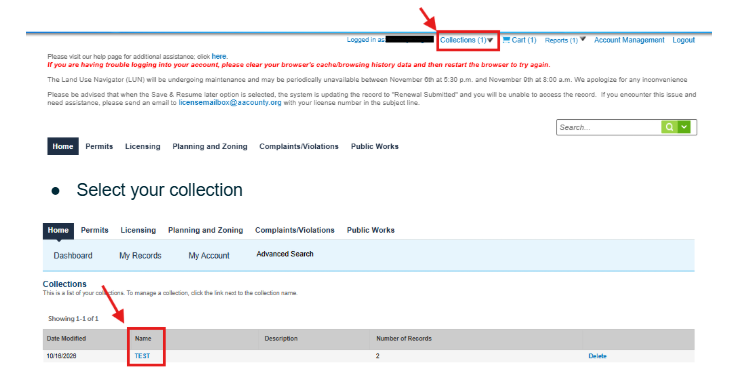
To pay for multiple permits from a collection
- Click the Collections tab.
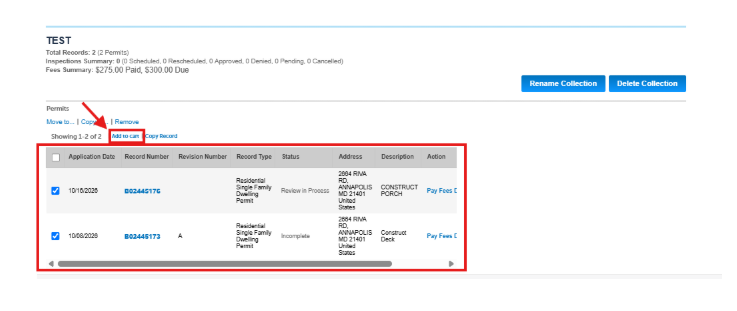
- Select the permits for which you would like to pay for and add them to the cart
- Go to your cart and select Checkout.
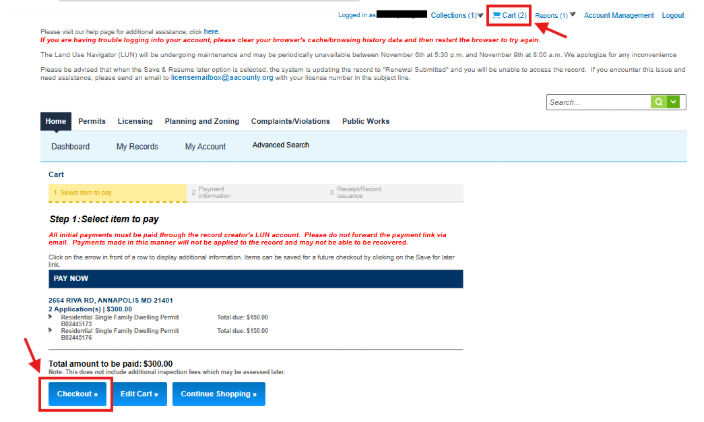
You will be directed to our third party payment system
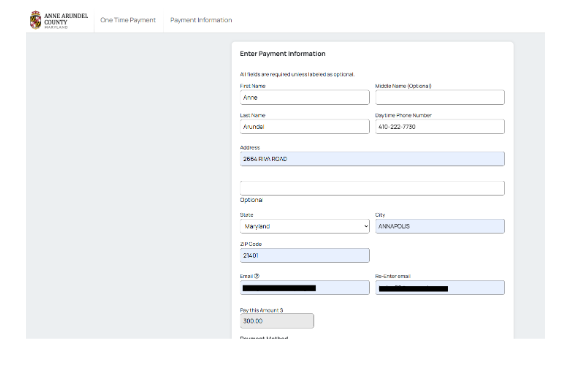
- Complete all required fields, choose your payment method, enter payment information and select continue
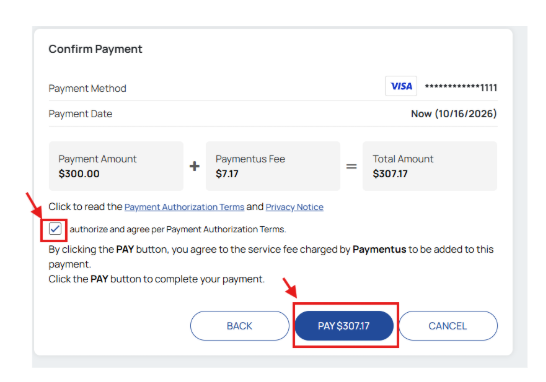
- Select the authorization box then the pay button
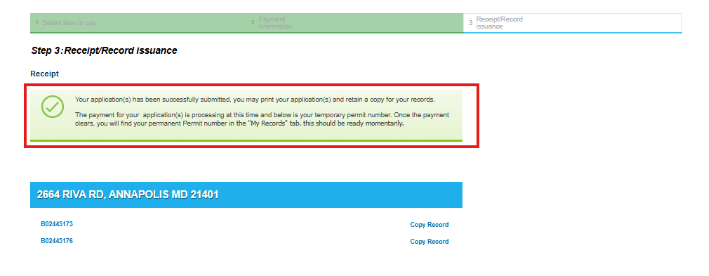
- A copy of your receipt will be sent to the email address you provided
*If you do not have an existing LUN account please refer to the General Access section for instructions to create an account*
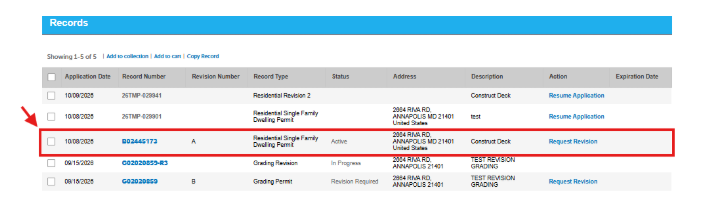
- Log in to the Land Use Navigator and from your home page, select My Records.
- Select the Record Number
- Click on the “Record Info” Dropdown
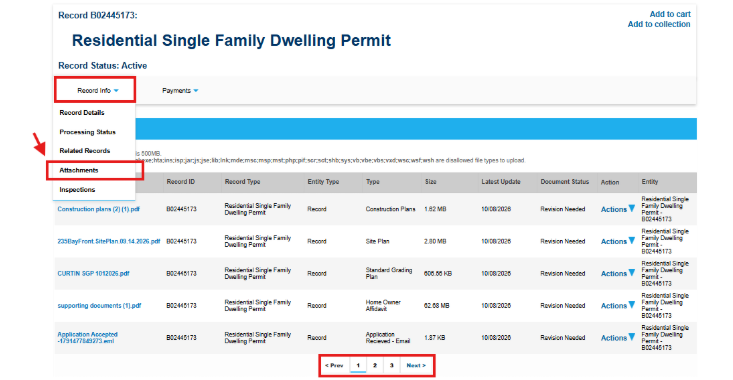
- Select “Attachments”
There are typically multiple attachment pages as shown above
To download an attachment, locate and click on the file you need to automatically download it to your browser. If you do not see the document on the first page, click "Next" to view additional pages.
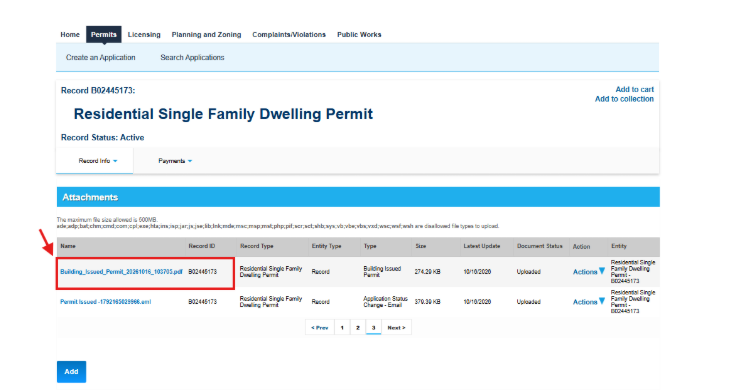
- The issued Building Permit will be labeled as such.
- The Approved Site Plans are labeled PERMIT#_ApprovedSITE
- The Approved Construction Plans are labeled PERMIT#_ApprovedPLAN
- Comments letters from reviewers will be labeled as such
- Certificate of Occupancy will be labeled as such or CofO Report
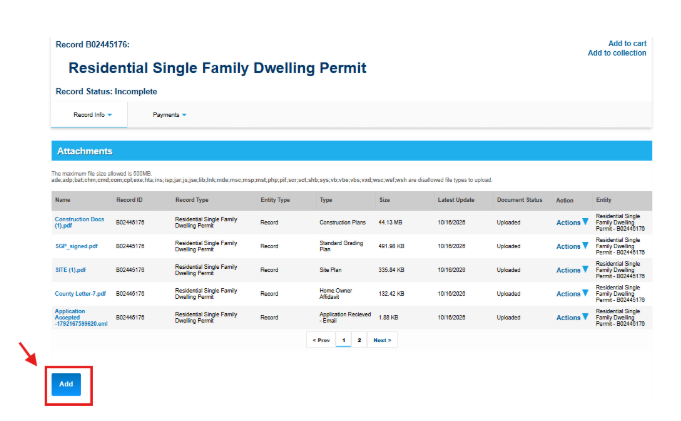
- Another box will appear, select “Add” again and select the files you want to upload. Once uploaded, confirm all files are uploaded in .pdf format. If you need to remove the attachments select “Remove All”. Select Continue.
- Select the “Type” for each of the uploaded attachments. You can also add additional attachments or remove the uploaded attachments on this screen. A description of the attachment is not a requirement. Once you continue on this screen you will NOT have the option to delete the uploaded attachments. Select Save
- A green banner will appear at the top of the page indicating that the attachment has successfully uploaded
Any associated trade permits that are eligible for renewal will automatically be renewed with the renewal of the building permit. You do not need to submit a separate request for each associated trade permit
*If you do not have an existing LUN account please refer to the General Access section for instructions to create an account*
Log in to the Land Use Navigator and from your home page, select My Records.
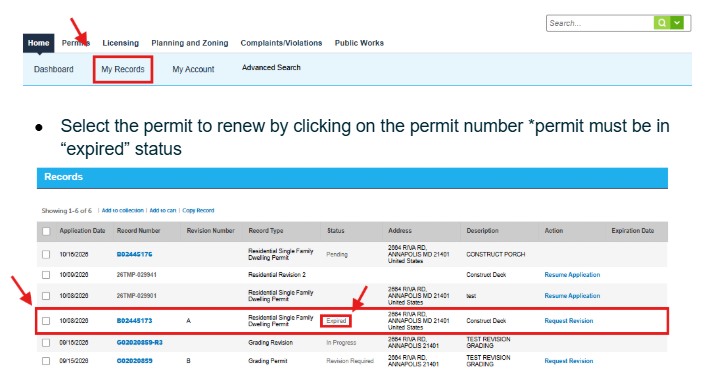
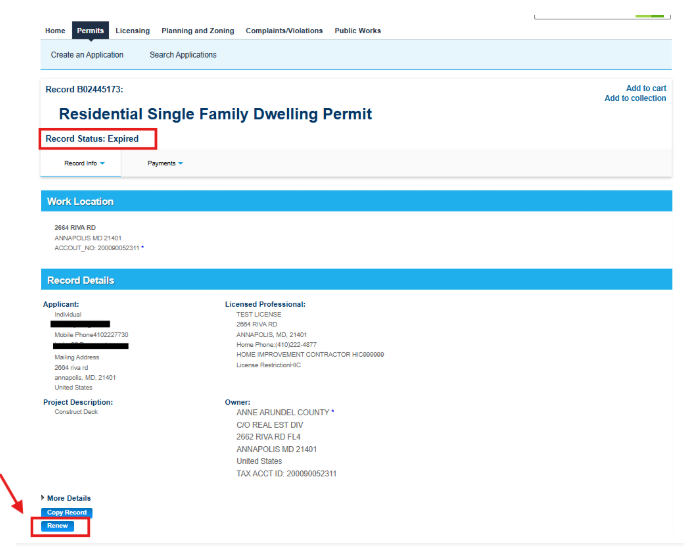
- Scroll to the bottom of the page and select “renew”
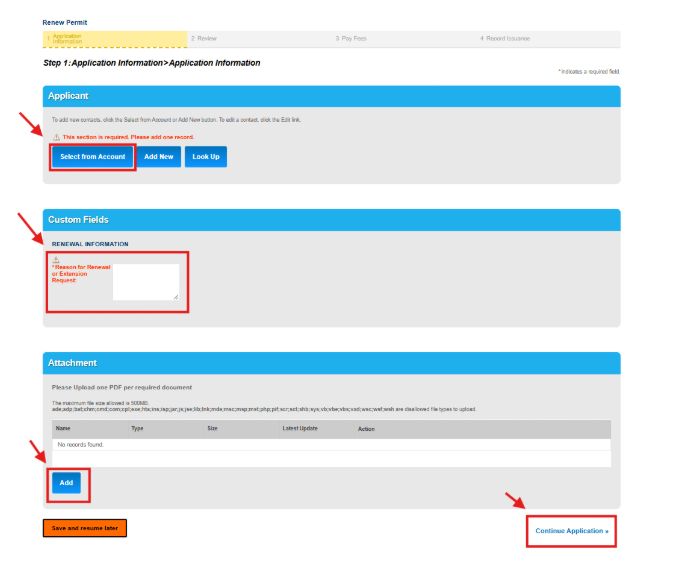
- Click “Select from account” to add the applicant and complete the reason for the renewal request
- Upload any supporting documentation (if applicable)
- Verify all submitted information is accurate, check the certification box, and click “continue application”
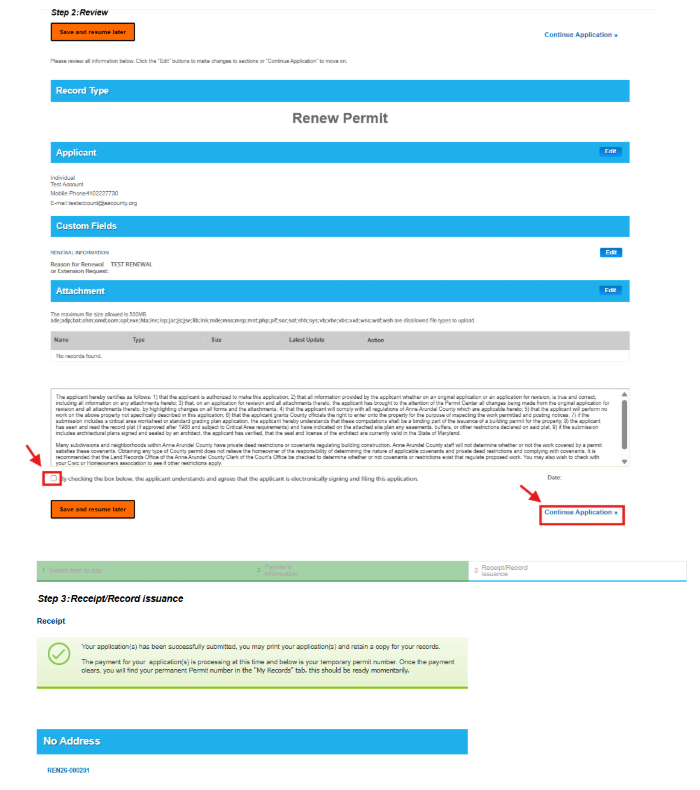
Your renewal has been submitted successfully. You will receive a verification email at the email address provided for the applicant. The required agencies will review and process your request.
Upon approval of the renewal request, a communication email will be sent to the applicant. The renewal fee will also be assessed and due prior to the scheduling of any inspections.
- You do not need to be logged in to access Fee reports The only information you need to get started is your record number. However, if you are logged in, you can access the report by choosing the selected record and selecting the Report function.
- Log in to the Land Use Navigator
- Once you click the Permits tab, a small option labeled Reports will appear in the upper right corner.
- If you do not have access to your record number please visit the General Access page for instructions on how to search for existing records.
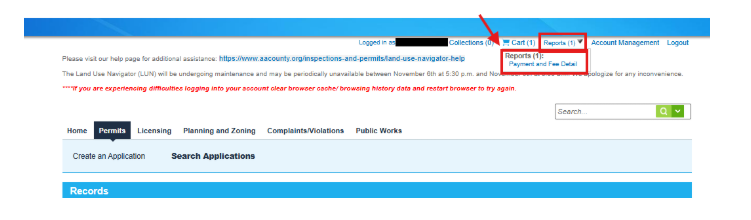
- Select Payment and Fee details
- A pop-up will prompt you to enter your record number. Type your record number into the field and select continue
- After submitting the record number, an itemized breakdown of fees assessed, fees paid, and fees due will generate. This document includes all the dates necessary to maintain accurate accounting records.